AusZeit Project – Update.02
Well, actually this is not really an update of the project, I would rather see it as an interim balance. I am currently still busy modeling more objects for this project. In the first post about this project, I mentioned that I wanted to model all the objects myself in order to further improve my skills in this area. To get some distance from modeling, I’m trying to deal with the lighting mood at the same time, so I’ve been trying out and testing different lighting conditions in the last few days. At first I thought of a bright, light-flooded room, but after careful consideration I came to the conclusion that I wouldn’t achieve the right mood with a light-flooded rendering. I also remembered that you should always tell a kind of story, especially with architectural visualizations.
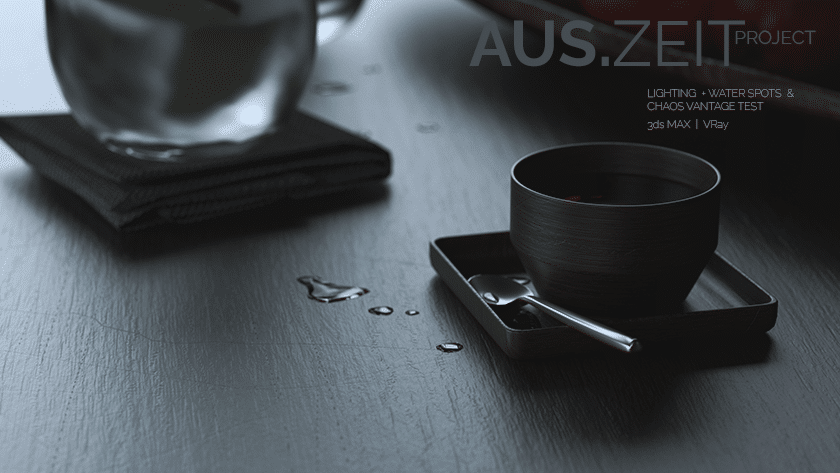
The objects shown here have nothing to do with the actual project. At first, I was only interested in the lighting mood, but while I was working on it, I came up with the idea of using water drops. Since I was satisfied with the lighting setup for the time being, I also wanted to try to see if I could realistically incorporate the water drops into the scene. To do this, I even set up a small scene in my own kitchen that looks very similar to this one. Basically, I just placed one of my designer mugs, along with a saucer and a small spoon, on my dining table and tried to randomly distribute a few drops of water. After I took a few photos, I realized that pure water was not really a good option, because pure water reflects too much and, due to its colorlessness, cannot achieve the desired effect. That’s why I boiled a real black tea just for this purpose. This proved to be exactly the right choice, because the darker coloration meant that the surface of the individual drops reflected much more homogeneously, and I also had the feeling that the consistency behaved differently. I noticed this very strongly when I repositioned the drops, because the liquid interacted differently with the table surface than pure water. This effect was particularly evident at the edges of the drops, these subtle little details do not catch your eye in everyday life, well, you don’t usually pay attention to such details and details in everyday life.

As you can see above, I managed to realistically visualize such water drops after four attempts, at least I hope so. For some of you it may be surprising why someone makes such a fuss about a few water drops, but I can tell you that it is not as easy as you might think. Especially that it looks realistic afterwards. This starts with modeling the water drops and this was not an easy exercise at the beginning. The first time I tried, I created a simple sphere and deformed it until I thought it looked like a water drop. The realization was that it doesn’t work that easily. Of course, there are small water drops with a fairly smooth surface, but they are rather small. As soon as they are a little bigger, the surface is no longer as smooth as you would expect. There are smaller and larger elevations, and modeling them would have been a bit too time-consuming for me, so I came up with the idea of using Max’s extremely good “particle system”, which also allowed me to incorporate more randomness. That worked really well, and after creating a few fluid shaders and trying and testing a lot, I finally came up with this quite acceptable result after a few attempts.
My goal is also to create a 2 to 3 minute animation of the project and I actually thought first of the Unreal Engine or Twinmotion, which was recently made available for free by “Epic Games” for everyone who earns less than $1,000,000 a year. I’ve been a big fan of the Unreal Engine for a long time, but the Unreal Engine also has its own way of doing things. Since this project uses quite a lot of materials and textures, I don’t want to go through the effort of porting all the textures to the Unreal Engine, which means a lot of work and headaches if you’re going for absolute realism. Even if you’ve got everything cleanly into the Unreal Engine, it’s by no means certain that the individual materials will look as good as they do in VRay. I have seen some videos and examples from other ArchViz artists who are also not entirely convinced of the quality. However, to be fair, it should be mentioned that the Unreal Engine also offers real “real-time rendering” for this, including for animations. To achieve this, the Unreal Engine smoothes out or gets rid of a lot of things under the hood, to put it simply. If you want speed, you have to make sacrifices in the quality of the textures.
I thought long and hard about what would make sense for me and whether there was a middle ground. Since I also want to spend more time on animations in future projects, it should be a tool that can handle Max and VRay scenes comfortably on the one hand and offers me the necessary quality of the individual textures on the other. Of course, a fast speed would also be very nice, but for me it plays a rather subordinate role if the quality and the result are right. Although the costs for the Max, VRay and Corona license are actually quite high, I wanted to avoid having to purchase an additional license for another product.
I tested the free version of “D5-Render” and to be honest, I’m not really convinced. You can create relatively fast animations and various weather simulations, but the quality of the textures is still too bad for me. Even though “D5-Render” has some good approaches and there will be a lot more to come, “D5” is not a serious option for me at the moment. After watching a few videos and reading reports about “Chaos Vantage”, I think this is the best option for me in the long term. I’ve been following the development of Vantage for a good two years now and, after thinking about it all the time, I’ve finally decided to get a Vantage license. The following little animation is nothing special, but I’m really happy with the overall handling of Vantage. I can transfer the entire Max/VRay scene directly to Vantage with just one click and I didn’t have to change anything in the light setup, the cameras or the textures. That’s one thing I really like. Even creating and setting up additional cameras for the animation is a breeze.
I started with a FullHD resolution and a rather low sample rate of 30 with a noise threshold value of 0.01 and an activated “RTX AI Denoiser”. I’m not really a fan of any denoiser, but I just wanted to see how well it does its job. The total render time was about 47 minutes for 600 frames. As I mentioned, the quality of the animation is not exactly top-notch, but you can definitely already see that the quality of the textures is already remarkable. If I increase the output format to 4k, disable the denoiser and increase the samples to 200 to 300, the render time will certainly increase to about 3 to 4 hours. I will definitely test this in the coming days and I am curious to see what I can get out of Vantage.